![]()
This tutorial shows all the ways to install the 3D creation software Blender in Ubuntu, including Snap, Flatpak, native Deb packages, and compile from source tarball.
Blender is a free open-source software for creating animated films, visual effects, computer games. It’s available to install in Ubuntu via a few different package formats. Here you may choose the one that you prefer.
1. Blender Snap package:
The software developer team offers official snap package that works on Ubuntu and most other Linux distributions. Snap is an universal Linux package format developed by Canonical, the company behind Ubuntu.
The Snap package features:
- Easy to install.
- Auto update.
- Maintained by Blender Foundation.
- Works on 64-bit modern PC only.
- Run in box with snapd daemon, though pre-installed out-of-the-box.
- Take more disk space than native deb package.
Install Blender Snap package:
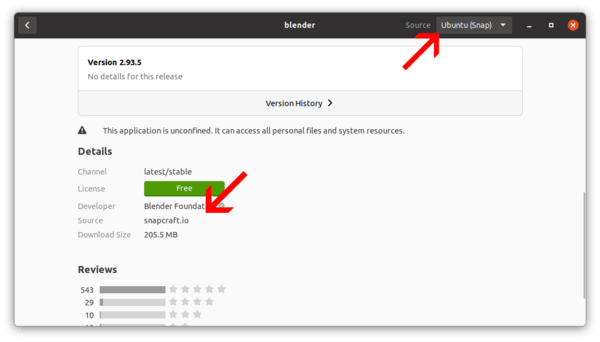
The package is easy to install as mentioned. Simply open Ubuntu Software, search for and install Blender. From both package details and header bar, it’s marked as Snap package.
2. Blender in Ubuntu Universe repository:
Ubuntu has the 3D creation software in its official repositories. Though it’s always old, it has multi-arch support!
stock Blender package features:
- Easy to install.
- Official package by Ubuntu, but no update anymore.
- Works on 64-bit PC, arm64 (Apple Silicon, Raspberry Pi), armhf, ppc64el, and s390x processors.
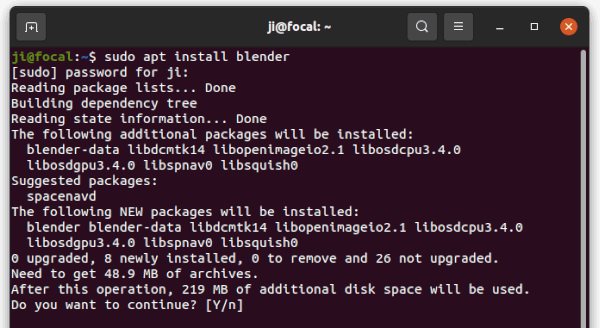
The stock deb package is also available to install in Ubuntu Software, though it sucks and may not work! Instead, users may open terminal by pressing Ctrl+Alt+T on keyboard, and run apt command instead:
sudo apt update && sudo apt install blender
And to uninstall the package, use sudo apt remove --autoremove blender command in terminal.
3. Blender Flatpak package:
Flatpak is another universal Linux package format that was developed as part of the freedesktop.org project. Blender is available as Flatpak package in the flathub repository.
The Flatpak package features:
- Auto update.
- Maintained by the community.
- 64-bit modern PC only.
- Run in box with flatpak daemon.
- Take more disk space than native deb package.
Install Blender Flatpak package:
To install the package, open terminal either by searching from activities overview screen or by pressing Ctrl+Alt+T on keyboard. When terminal opens, run following commands one by one.
- Run command to install flatpak daemon:
sudo apt install flatpak
- Add the flathub repository:
flatpak remote-add --if-not-exists flathub https://flathub.org/repo/flathub.flatpakrepo
- Finally install Blender via command:
flatpak install flathub org.blender.Blender

And it can be easily removed via flatpak uninstall org.blender.Blender command.
4. Blender Portable Linux Tarball:
The Blender website provides Linux Tarball in its download page. Just grab the package, extract in your file manager, and right-click run the executable file from generated folder will launch the program.
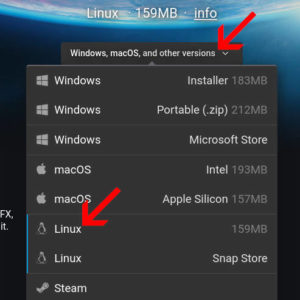
No installation required, but only works for Linux on 64-bit modern desktop PC and laptop.
5. Install Blender from Ubuntu PPA:
Some Ubuntu users do NOT like the Snap and Flatpak packages. Besides portable Linux tarball, third-party PPAs is one of the choices.
The PPA package features:
- Native deb packges.
- Able to upgrade through “Software Updater”.
- Maintained by unofficial third-parties.
Blender PPAs:
There are quite a few Ubuntu PPAs contains the 3D creation software package. You can find them in THIS PAGE.
So far, the Rob Savoury’s PPA contains the most recent Blender 2.93.4 (check the link) packages for Ubuntu 16.04, Ubuntu 18.04, Ubuntu 20.04 and higher for 64-bit PC. However, it was built with updated FFmpeg libraries that might break other package dependencies in your system.
To install Blender from the PPA, open terminal and run the commands below one by one:
sudo add-apt-repository ppa:savoury1/ffmpeg4
sudo add-apt-repository ppa:savoury1/blender
sudo apt-get update
sudo apt-get upgrade && sudo apt-get dist-upgrade
sudo apt-get install blender
And to remove the PPA packages, run following commands one by one in terminal to purge the PPA repositories which will also downgrade the installed packages:
sudo apt install ppa-purge && sudo ppa-purge ppa:savoury1/blender
sudo ppa-purge ppa:savoury1/ffmpeg4
6. Blender Appimage package:
The software is also available as single Appimage binary package, though it seems not being updated regularly.
The Appimage is a non-install package works on most Linux systems. Users just have to add executable permission in file’s Properties dialog, then right-click and select run to launch the program.
The Appimage package features:
- 64-bit PC only.
- no installation required.
- Runs in most Linux, like Snap and Flatpak.
- Unofficial.
The Blender Appimage is available to download at THIS PAGE and it’s v2.90 at the moment.
7. Compile Blender from the Source:
If none of the previous methods meet your need, you can build the software package from source code, though it’s not recommended for beginners.
Build from the source features:
- Not beginner friendly.
- Works on all processor architecture, though Blender 2.8+ need GPU with OpenGL 3.3+ support
- Build whatever version with optional functions as user prefer.
- Build process may fail due to “unknown” reason, and need technical support.
How to Compile Blender from source tarball.
Firstly, download the source tarball from the link page below:
Install the build dependencies:
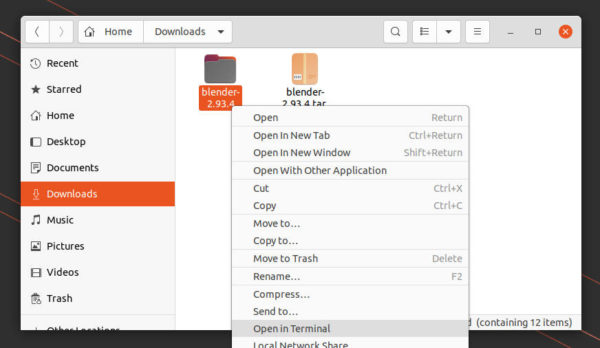
1.) After downloaded the source tarball, extract it in the file manager. Then right-click on source folder and select ‘Open in Terminal‘
Blender 2.9x has an ‘install-deps.sh’ script that automatically install the build depends both from system repositories and by download and building others from source.
2.) When terminal opens after clicking the previous menu option, first run command to install essential packages:
sudo apt install build-essential git subversion cmake libx11-dev libxxf86vm-dev libxcursor-dev libxi-dev libxrandr-dev libxinerama-dev libglew-dev libwayland-dev wayland-protocols libegl-dev libxkbcommon-dev libdbus-1-dev linux-libc-dev
3.) Next, run the script to start installing build dependencies:
sudo ./build_files/build_environment/install_deps.sh

NOTE: the script may fail building dependencies from source tarballs. You may skip and/or specifies what to build via flags. And, find out the command options via:
sudo ./build_files/build_environment/install_deps.sh --help
So the command might be (run scrip with --show-deps shows required libraries):
sudo ./build_files/build_environment/install_deps.sh --with-embree --build-python --skip-oiio
4.) You may need to run the script several times to install the dependencies successfully. After that, create “build” folder in the source directory:
mkdir build && cd build
And configure the source with your preferred options, for example:
cmake ../ -DCMAKE_INSTALL_PREFIX=/usr -DWITH_INSTALL_PORTABLE=OFF -DWITH_BUILDINFO=OFF -DWITH_PYTHON_INSTALL=OFF
The command will generate “CMakeCache.txt” in “build” folder under source. You can edit the file to change build options.
5.) Finally build Blender if everything goes OK. Depends on how many CPU core that you have, you may change -j4 (4 threads) to -j8 to speed up the process.
make -j4
And finally install Blender via sudo make install if make succeed.
Summary:
For Ubuntu users, there are quite a few ways to get Blender running. The easiest and official way is search for and installing the SNAP package from Ubuntu Software. However, the old .deb package in universe repository support more processors, e.g., Apple Silicon, Raspberry Pi and other Mobile devices. To test without installing, there’s Linux portable tarball present in official download page. And third-party Ubuntu PPAs maintains most recent packages in native .deb format. Also, advanced users may build it from source with free options.