The notion that good quality cable is an important part of sound reproduction has been widely accepted among hi-fi enthusiasts for a long time, but musicians have been a little slower to catch on. In this article, I’d like to explain how quality cable can make a difference to your sound, clear up some common misconceptions, and show you step-by-step how to make your own high quality guitar lead for a fraction of store prices.
Why Cable Quality Matters
To be completely honest, I was always more than a little sceptical about how much real difference my choice of guitar cable could make to my sound. Sure, my cables would get a little crackly and micro-phonic through use and abuse, and some of them would even pick up the local taxi company and foreign radio stations from time to time, but I could never quite believe that expensive boutique cables would be any different, much less that they’d produce a better tone.
When eventually I tried it for myself, I couldn’t believe the results. Not only was there almost no noise, but my whole guitar tone had changed for the better: tighter bass, smoother highs, more detail and astounding clarity. My only regret was that I’d waited for so long. Of course, you may well have read this kind of glowing testimony before and thought “Yeah, right, and exactly how much are you being paid to shill for the copper industry?” And while it certainly goes without saying that what’s true for my ears and my setup isn’t necessarily true for yours, I’ve experienced a big enough difference that I’m fairly confident that many other musicians will hear the difference too.
Ultimately, the only way to know for sure is to try it for yourself. Later in this article, I’m going to show you how you can make your own cable for much less than buying pre-made, and it’s worth noting that, if you want to try before you buy, many cable suppliers will supply short lengths as free samples.
What Makes a Good Instrument Cable?

The key factors to look for when choosing instrument cable are good screening from noise, low capacitance and high quality connectors.
Screening
Keeping noise to a minimum is achieved by shielding the conductor from electrical interference, usually with a braided copper, some form of conductive plastic jacket, or both. Different manufacturers have different methods but, typically, any good quality audio cable should be appropriately screened.
Capacitance
Capacitance refers to the cable’s ability to respond changes in voltage, and is measured in picofarads (pF) per metre or per foot; a figure of around 70 pF/m would be quite low for instrument cable. For high impedance sources, like passive guitars and basses, lower capacitance translates into better frequency response. Also, since capacitance is measured per unit of length, a longer cable will have more capacitance than a shorter one, so it makes sense to use only as much cable as you really need.
Connectors
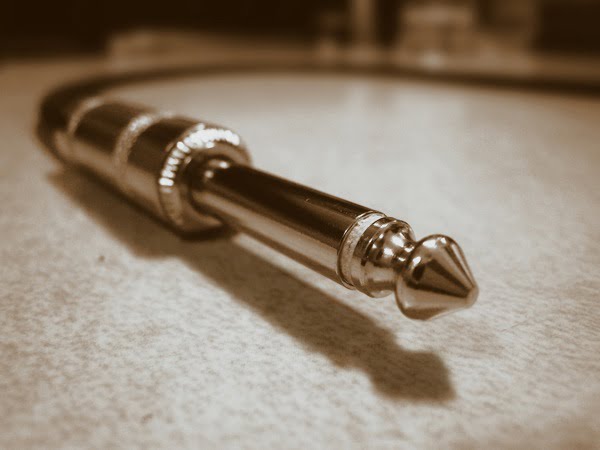
Any good quality mono jack plug, for example Switchcraft or Neutrik, will work fine. In general, there’s really no need to waste money on gold plated connectors. Apart from anything else, you’re most likely plugging in to a regular, nickel plated guitar or amplifier jack, so any benefit the gold might have is largely lost. More to the point, the reason gold is preferred in some applications is not its superior conductive properties but its resistance to corrosion. The down side with gold is that it is quite soft and therefore less well suited to applications where it’s going to encounter a lot of wear, for example on the end of a guitar lead that gets plugged in, unplugged and plugged in again many times ever day. In short, you really don’t need gold on a guitar cable.
A note about impedance
Guitars and basses with active pickups are low impedance sources, and so are far less susceptible to the effects of cable capacitance than high impedance sources like passive guitar pickups. In other words, if you only ever use instruments with active circuitry, you probably don’t need to worry too much about cable capacitance.
Furthermore, your effects pedals will usually have a low impedance output, too, so the patch leads between your pedals and the cable from your pedal board to your amp needn’t be super-low capacitance, either (unless you’re using all true-bypass pedals and have them all switched off). Generally, capacitance is only an issue in the cable coming from your guitar to either the amp or the first pedal in the chain.
Why It’s Worth Making Your Own
As I’ve shown, those cheap, ratty old cables we guitarists and bassists are so attached to can be more detrimental to our pursuit of great tone than many of us realise, but putting this right can look like an expensive proposition. A typical 6 metre (20 foot) cable from some of the high-end brands can be anywhere from £30 to £80, and no matter how big your gear budget is, that’s an expensive piece of wire.
The good news is that a step closer to guitar tone nirvana needn’t mean spending a small fortune on boutique, silver plated lengths of purest unobtanium. Any well screened, low capacitance cable should make a noticeable improvement over that tired, ratty old thing you don’t remember buying, and if you’re comfortable with a soldering iron, it’s really very easy and inexpensive to make your own.
Good quality cable can be bought “off the reel” from around £1.40 (US$2) per metre, and good connectors for around US$4 each. Moreover, manufacturers who sell cable in this way are usually a lot more forthcoming about the specifications of their products than many of the pre-made guitar lead makers. As an example, I made my 6m guitar cable using Klotz AC110 and Neutrik connectors for under £15. The same cable is available ready made for just under £30.
Convinced? Want to try? Here’s how:
Buying Components
Buy cable “off the reel”
With a little online research, you should be able to find an electrical parts supplier near you that sells good quality cables “off the reel” (i.e., they’ll cut you a length of whatever cable you want). Look out for cables from manufacturers including Canare, Klotz, Sommer and Van den Hul, but don’t be afraid to check out the specifications on others, too, and if it looks good, see if they store will let you have a free sample to test it out with.
It’s usually worth buying about 1 m (3 ft) more than you think you’ll need, just to give you a wide margin for error.
Get the right plugs
For one guitar cable, you’ll need 2 good quality mono plugs. As I mentioned earlier, any good quality, metal cased straight or angled 1/4” plug will work well: there’s no need to use gold plated plugs.
Set Up Your Workspace

Any desk or table where you can sit comfortably will work fine as a workbench but, unless it’s an actual workbench, do take care to put down an old blanket or some newspaper before starting work.
You’ll need:
- A soldering iron and stand
- Some solder
- A damp sponge or cloth to wipe the iron on
- A sharp knife or wire strippers
- And, since we’re dealing with hot things and cable that can have a mind of its own, some means of holding the cable steady while you work. You can buy “helping hands” which have adjustable arms and crocodile clips but, if you don’t have one, I’ve found that using some Blu-Tack to hold the wire or plug still works quite well.
Step 1: Stripping the Insulation

At each end of your cable, carefully strip about 1 cm of the plastic insulation from the cable. I like to do this by rolling the cable on a penknife blade since it feels more precise and controlled than using my (admittedly rather blunt) wire strippers, especially when dealing with the conductor. Whatever method you use, be careful to apply only enough pressure to cut the cable jacket: don’t snip right through the copper wire! This is where that extra metre of cable can come in handy.
Step 2: Prepare the Wire

The conductor is the thin wire in the centre of the cable. The shield is the outer layer of copper strands, and is usually braided around the circumference of the cable.
Tightly twist the shield strands together, making sure there are no loose strands, and fold it back out of the way. Now strip around 5 mm of the inner jacket from the end of the conductor wire, using either a knife or wire strippers. As before, twist the copper strands together.
Before going any further, check that the cable fits properly into the plug. The grip on the connector needs to be able to clasp around the outer jacket of the cable, and the two wires should be able to reach their respective terminals (centre conductor to the centre terminal, outer shielding to the outer terminal). Ideally, we want as little exposed wire in there as possible, so it should be quite a tight fit without straining the wire. If necessary, strip a little more insulation until you have a good fit.
Now, we’ll “tin” the ends of these wires with solder to keep them from unravelling and help them adhere to the terminals in the plug. We want to ensure there are no stray strands of copper so, before soldering, double check that the wire is properly twisted together.
Get your soldering iron hot and, starting with the shield, place it under the twisted wire. Touch the iron to the copper for a moment before bringing the solder down on to the top of the wire. The solder should melt over the twisted copper strands, forming a neat cap of solder. You may need to repeat the process a couple of times to get even coverage.
Warning: copper is a good conductor of heat, as well as electricity, so avoid holding the wire with bare hands.
Step 3: Solder the Cable to the Plug

Before you solder, do a quick trial assembly to make sure everything fits and you know which parts of the plug casing need to be on the cable before you attach the plug.
Grip the connector with your helping hand, or Blu-Tack it to your workbench, and gently heat the outer terminal with the iron. Don’t overdo it or you may damage the plug. Touch a little solder onto the terminal and then solder the screening wire to it. Now do the same thing with the centre conductor, attaching it to the centre terminal of the plug.
Make sure your work is tidy: you don’t want any stray strands of wire touching across the terminals or the outer casing of the plug.

Now assemble the plug and screw it together, being careful not to twist the cable in the plug casing.
Step 4: Rinse, Repeat and Test

Clean your soldering iron and repeat the above process for the other end of the cable. Before you pack up your soldering iron, plug the cable in to make sure it works and that there are no unwanted noises. If it isn’t working, or there is noise, check both ends of the cable to see that there are no stray strands of wire and that you’ve connected to the correct terminals.
Step 5: Rock!

Congratulations! You just made your own guitar lead! Plug in, turn up, and have fun!
Remember that your pedals, even when switched off, can have an effect on your tone so, to begin with, try plugging directly into your amplifier to hear the undiluted effect of your new cable, and A/B test with your old one to hear the difference.
Finally, please use the comments are to discuss your experiences; we’d love to hear about your results!